5.5 How To Configure Private Shell and WinCVS to work with SourceForge.net
SourceForge.net is a very big site used by open-source
projects developers to store all information about their
projects and share it with others. SF does not allow any
other access protocol than SSH because of security reason
and offers CVS service to store source code and record all
its changes. This topic covers the operations you should
perform to work with SF.net through the Private Shell SSH
client.
Terminal access to SourceForge.net
First of all you must have your own project on the SF.net site.
If you do not have it yet, you can register and hand in an application
for your own SF.net project
here.
It is absolutely free
but you should know that only open-source projects can be hosted on SF.net.
Then you have to wait until your project is approved by the SF.net team.
Usually it takes from 1 to 3 working days.
When you receive a confirmation e-mail letter with your project approval,
you can begin to configure your software to work with SF.net.
You can refer to the Password Authentication and
Public Key Authentication (optional) topics to get known
more about SSH authentication and basic Private Shell functionality.
Configuring Private Shell:
- Start Private Shell and create a new profile (select the "Profiles" ->
"New profile..." menu item). Name it
login@shell.sourceforge.net,
where login is the name you use to log in to the SF.net web site
and click the "OK" button.
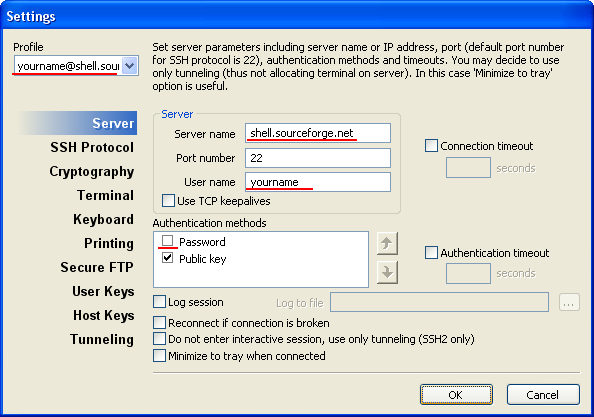
- In the "Settings" dialog switch to the "Server" tab and
enter shell.sourceforge.net in the "Server name" field and
your login in the "User name" field. Leave "Port number" with 22 and
uncheck the "Password" box in the "Authentication method" field.
Leave all other settings with the default values.
- Click the "OK" button. This saves new profile to the Private Shell
database.
- Repeat steps 1 - 3 again, but create a profile with name
login@cvs.sourceforge.net and enter cvs.sourceforge.net
in the "Server name" field on step 2.
- Now you need to generate a key that you will use to authenticate and work
with SF.net servers. Select the "Profiles" -> "Edit profiles" menu item
and switch to the "User Keys" tab.
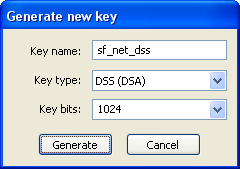
- Click the "Generate new key..." button. In the key parameters dialog
select 1024 bits DSS key type, give it a name like "sf_net_dss" and
click the "Generate" button.
- Generating a key may require some time depending on the power of your
processor. You can protect the key with a password so no one having access to your
computer will be able to use it. This is highly recommended unless you
are absolutely sure that only you alone have access to your machine.
- Make sure that the key you have just generated is selected in the
both SF.net profiles (the box corresponding to the key name should be
checked in the "User keys" field for both of the profiles). Also it is
recommended to uncheck all other keys (if you have any) for these profiles.
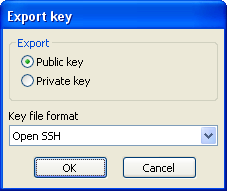
- You cannot upload your public key to SourceForge.net directly through the
SSH client, so do not even try this! Instead, click the "Export key" button,
select "Public key" key type to export, "Open SSH" key format
and click the "OK" button.
- Append the ".txt" extension to the name of a file in the "Save as" dialog and click
the "Save" button.
- Open the file that you have just exported in the Windows Notepad (or any other suitable
text editor). You should see only one text line beginning with the "ssh-dss" symbols.
- Select this entire line and copy it to the clipboard.
- Log in to the SF.net web site, go to your
Account options and
click on the
[Edit SSH Keys for Shell/CVS] anchor.
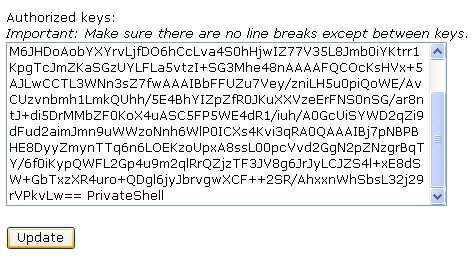
- Paste the key data from the clipboard to the "Authorized keys:" field and
click the "Update" button.
- You will be returned back to the "Account options" page. Please note that
the number of uploaded SSH keys now is 1:
- Now you have to wait for 20 - 30 minutes because SF.net system needs some
time to transfer your SSH key from the web site to the shell and CVS servers.
- Private Shell is properly configured to connect to the SF.net shell server!
You can also use the Secure FTP client to upload or download files to or from
the server.
Developer CVS Access via SSH
First of all read the How To Use Private Shell with CVS topic.
Than do all the actions required to get terminal access to the SF.net site
through Private Shell (see above).
Configuring WinCVS:
- Set the environment variable
cvs_rsh=ssh.exe
- Set the environment variable
PRIVATESHELL_CLI_PROFILE=login@cvs.sourceforge.net
where login is the name you use to log in to the SF.net web site.
- Set the environment variable
CVSROOT=:ext:login@cvs.sourceforge.net:/cvsroot/projname
where projname is the name of your project on SF.net.
You may set these variables for the entire system or use a batch-file method
described in the How To Use Private Shell with CVS topic to
set them locally for just one folder where you are planning to place your
working files.
Anonymous CVS Access
Since SourceForge.net hosts open-source projects only, anybody can
obtain read-only CVS access to a source code of any project. "read-only" means
that you can only check out such a project.
Configuring WinCVS:
- Set the environment variable
CVSROOT=:pserver:anonymous@cvs.sourceforge.net:/cvsroot/projname
where projname is the name of the desired SF.net project.
- Run command
cvs login
- Check out the desired module:
cvs checkout modulename
where modulename is the module that you want to check out.
If you are prompted for a password for anonymous, simply
press the Enter key. To determine the name of the modules created by a
particular project, you may examine its CVS repository via the
provided by SF.net web-based CVS repository viewer.
|