5.4 How To Establish Secure Connection to a VNC Server through Private Shell
This topic describes how to establish secure connection to a VNC*
server using Private Shell.
To use Private Shell with VNC you have to be able to connect to
the server via SSH first. Read the Password Authentication and
the Public Key Authentication (optional) topics.
Configuring Private Shell
- Open the profile settings dialog ("Profiles"->"Edit Profiles...") and
select a profile which you want to use with VNC.
- Click the Tunneling tab.
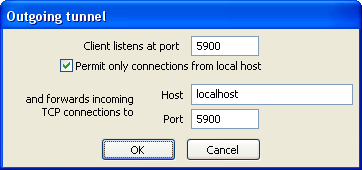
- Click the New outgoing tunnel button. The outgoing tunnel
settings dialog will appear.
- Enter the name of the host running VNC server to the Host
field. Please note that if the VNC server is run at the same host as
the SSH server that you connect to, you should enter localhost
here.
- Take the number of VNC screen you want to connect to, add this value
with 5900 and enter the result to the Client listens at port
and Port fields. For example, if you want to connect to
the screen #0, you should enter 5900 to the both fields. If you
want to connect to the screen #1, you should enter 5901 and so on.
- Repeat the last step again if you want to connect to more than
one VNC screen with this profile.
- Clear the "Permit only connections from local host" box if you
want other computers on the network to be able to connect to this VNC
server through your Private Shell.
Configuring VNC server
Warning! This paragraph is related only to the VNC servers running
under the Microsoft(R) Windows(R) operating systems family.
If you want to connect to the VNC server running under other OS, please
proceed to the next paragraph.
By default VNC server running on Windows platform does not allow local
connections (as you cannot connect to the same desktop you are
working on).
But when VNC server is connected through the SSH tunneling,
SSH server software have to connect to the VNC server on the same computer.
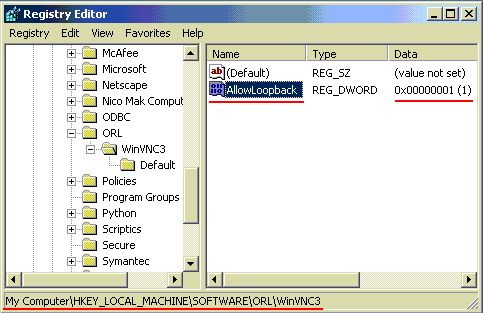
To allow this you have to patch a registry item value on the remote computer
running VNC server (you can use non-secure VNC connection to do this):
- Launch the VNC viewer and connect to the host running VNC server.
Warning! All the rest operations should be done on the
remote computer through the VNC.
- Click the "Start" button, select the "Run" item, type in
"regedit" and press the enter key.
- Open the HKEY_LOCAL_MACHINE\SOFTWARE\ORL\WinVNC3 registry
branch.
- Create the AllowLoopback or LoopbackOnly (if you want
to allow local connections only) parameter of type DWORD and
set its value to 1.
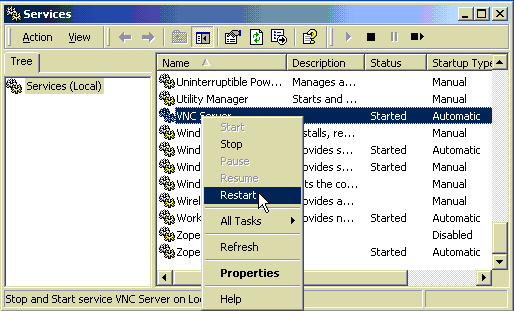
- The VNC service must be restarted in order the changes to take
effect. But if you just stop it you will not be able to connect to
this computer remotely to start it back anymore!
- Click the "Start" button, "Settings", "Control Panel". In the
control panel double click the "Administrative Tools" icon.
- In the administrative tools double click the "Services" icon.
- In the services find the "VNC Server" service,
click the right mouse button and select the "Restart" option.
- Your VNC viewer will be automatically disconnected.
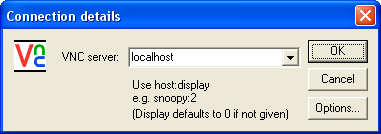
Launching the VNC viewer
Start Private Shell and connect to the SSH server. Then
Launch the VNC viewer and enter localhost:screen_number where
screen_number is the number of VNC screen you want to connect to,
e.g. localhost:2. If you do not specify a screen number,
VNC viewer connects to the screen #0.
*VNC stands for Virtual Network Computing
and offers cross-platform remote control system.
VNC itself does not provide any protection to the data
sent to and received from the server therefore an SSH client
like Private Shell is highly recommended.
If you want to know more about VNC, please refer to its official homepage at
http://www.realvnc.com
|